
Iced Mung Bean Cake.
Iced Mung Bean Cake
” Mung bean sweet and cool, clearing and detoxifying, Qu Shu thirst effect. Summer fast approaching, do a hot weather mung bean cake, make more of a cool summer. ”
The practice of Iced Mung Bean Cake
Step 1
Prepare the materials

Prepare the materials
Step 2
Peel and wash the mung beans, soak them in clean water for more than 4 hours in advance (I made them the night before)

Peel and wash the mung beans,
Step 3
Wash the soaked green beans and pour into the pot

Wash the soaked green beans and pour into the pot
Step 4
Add fresh water that has not passed the mung bean to the pot (the amount of water should not be too much, just a little less than the mung bean), and simmer for about 20 minutes until the mung bean is fully cooked (the power is low and cook slowly.

Add fresh water that has not passed the mung bean to the pot
Step 5
Put the cooked green beans into the cooking machine

Put the cooked green beans into the cooking machine
Step 6
Add fine sugar

Add fine sugar
Step 7
Whipped into a delicate mung bean paste with a cooking machine and poured out

Whipped into a delicate mung bean paste with a cooking machine and poured out
Step 8
Put butter in a non-stick pan and heat to melt

Put butter in a non-stick pan and heat to melt
Step 9
After the butter melts into a liquid, pour the mung bean paste and stir-fry over low heat until all the butter is absorbed

After the butter melts into a liquid,
Step 10
Continue to fry for about 10 minutes until the mung bean paste becomes dry and clumpy. Leave it in the pan and let it cool

Continue to fry for about 10 minutes until the mung bean paste becomes dry and clumpy.
Step 11
The surface of the chilled mung bean paste will be a little dry, you can wear disposable gloves to rub it evenly

The surface of the chilled mung bean paste will be a little dry
Step 12
Divide mung bean puree into 50g round balls, this amount can make about 11

Divide mung bean puree into 50g round balls, this amount can make about 11
Step 13
Brush the moon cake mold with a layer of oil to prevent sticking

Brush the moon cake mold with a layer of oil to prevent sticking
Step 14
Put green bean paste balls into the mold

Put green bean paste balls into the mold
Step 15
Just press out the shape

Just press out the shape
Step 16
After everything is done, it can be refrigerated for half an hour for better taste

After everything is done, it can be refrigerated for half an hour for better taste
Step 17
The finished mung bean cake cannot be eaten in one time, can be stored in the refrigerator to refrigerate, but should be eaten within 2-3 days

The finished mung bean cake cannot be eaten in one time
Step 18
Iced Mung Bean Cake Finished. Finally, you get home cooking Iced Mung Bean Cake.

Iced Mung Bean Cake Finished
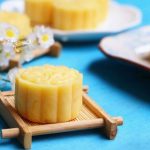
Iced Mung Bean Cake
Equipment(affiliate link)
- mold


Leave a Reply