
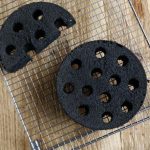
honeycomb briquette cake
“See the finished product, small make up the heart is frightened, how this next mouth, really dare not eat ah.Take the office to see the colleague, the result colleague say: your ya end two honeycomb briquette on what class!I took a bite in silence, only to stun them.But the taste is really good, and if you use a trick it’s even more fun. Make this cake a little more fun to live.”
How to make honeycomb briquette cake?
Step 1.
Material:
5 eggs, 50 grams of salad oil, 80 grams of whole milk, 70 grams of low gluten flour, 6 grams of corn starch, 40 grams of black sesame seed, 85 grams of fine granulated sugar, 8 grams of bamboo charcoal powder.

5 eggs, 50 grams of salad oil, 80 grams of whole milk, 70 grams of low gluten flour, 6 grams of corn starch, 40 grams of black sesame seed, 85 grams of fine granulated sugar, 8 grams of bamboo charcoal powder.
Step 2.
Preparation: Use egg separator to separate the yolk and egg white.

Preparation: Use egg separator to separate the yolk and egg white.
Step 3.
Crush the black sesame seeds with a grinder for later use.

Crush the black sesame seeds with a grinder for later use.
Step 4.
Sift together the low gluten powder, bamboo charcoal powder and crushed black sesame powder. Set aside.

Sift together the low gluten powder, bamboo charcoal powder and crushed black sesame powder. Set aside.
Step 5.
Mix the milk and salad oil together in a manual whisk.

Mix the milk and salad oil together in a manual whisk.
Step 6.
Add the egg yolks to the milk salad oil mixture and mix well.

Add the egg yolks to the milk salad oil mixture and mix well.
Step 7.
Add the sifted powder into the egg yolk mixture and stir well. Set aside.

Add the sifted powder into the egg yolk mixture and stir well. Set aside.
Step 8.
Whisk the egg white and cornstarch together to the eye-bubble state of the big fish. Add the granulated sugar in several times.

Whisk the egg white and cornstarch together to the eye-bubble state of the big fish. Add the granulated sugar in several times.
Step 9.
Continue to whip quickly until stiff peaks form and lift egg whites into an upright position.

Continue to whip quickly until stiff peaks form and lift egg whites into an upright position.
Step 10.
Mix 1/3 of the beaten egg whites with a silicone spatula.

Mix 1/3 of the beaten egg whites with a silicone spatula.
Step 11.
Pour the batter into the remaining egg whites and stir with a silicone spatula.

Pour the batter into the remaining egg whites and stir with a silicone spatula.
Step 12.
Pour the batter into a 6 inch cake pan.

Pour the batter into a 6 inch cake pan.
Step 13.
Lift the cake pan onto the table and shake it twice to remove the air from the batter.

Lift the cake pan onto the table and shake it twice to remove the air from the batter.
Step 14.
Put it into a preheated oven with upper and lower heat of 165 degrees. Bake it in the middle layer for about 40 minutes (the temperature and time can be adjusted according to personal oven time).

Put it into a preheated oven with upper and lower heat of 165 degrees. Bake it in the middle layer for about 40 minutes
Step 15.
After cooling completely, take out the cake with an exhibition plastic stripper.

After cooling completely, take out the cake with an exhibition plastic stripper.
Step 16.
Finally, the core remover is used to gently rotate the cake from side to side and press down until it reaches the bottom of the cake. Take it out and dig the honeycomb briquette hole in the same way.

Finally, the core remover is used to gently rotate the cake from side to side and press down until it reaches the bottom of the cake.
Cooking techniques
In a symmetrical way, 8 holes can be dug around the outside, and 4 symmetrical holes can be dug inside, making a total of 12 holes.
honeycomb briquette cake
Ingredients(affiliate link)
- 5 eggs
- 50 g Salad oil
- 80 g whole milk
- 70 g low gluten flour
- 6 g corn starch
- 40 g black sesame
Ingredient
- 85 g sugar
- 8 g bamboo charcoal powder

Leave a Reply